Drywall is one of the most common materials used in modern homes for walls and ceilings. Over time, though, walls can develop holes and dents from accidents, furniture bumps, or everyday wear and tear. A small hole may seem easy to fix, but larger or irregular damage can be challenging.
Whether you’re a DIY enthusiast or considering hiring a professional, repairing drywall properly is essential to maintain the aesthetic and structural integrity of your home. This comprehensive guide will cover everything you need to know about repairing drywall holes—from tools and techniques to professional tips for a flawless finish.
Understanding Drywall Damage
Before repairing drywall, it’s important to understand the type of damage you’re dealing with. Drywall holes typically fall into three categories:
- Small Holes (< 1/2 inch) – Often caused by nails, screws, or minor accidents.
- Medium Holes (1/2 inch – 6 inches) – Usually from doorknobs, furniture impacts, or removal of wall fixtures.
- Large Holes (> 6 inches) – Caused by major accidents, structural damage, or water leaks.
Different hole sizes require different repair methods. Using the wrong technique can lead to cracking, uneven surfaces, or an unprofessional look.
Tools and Materials You’ll Need
Having the right tools is critical for a smooth repair. Depending on the size of the hole, you may need:
For small holes:
- Spackling compound or patching paste
- Putty knife
- Sandpaper (fine grit)
For medium holes:
- Drywall patch or mesh tape
- Joint compound
- Putty knife
- Sanding sponge
- Primer and paint
For large holes:
- Replacement drywall piece
- Drywall screws
- Drywall saw or utility knife
- Joint compound and tape
- Sanding tools
- Primer and paint
Pro Tip: Always have a clean rag and some water handy for smoothing compound edges.
Step-by-Step Guide for Small Holes
Small holes are the easiest to fix and can often be done in under 30 minutes.
Steps:
- Clean the area around the hole. Remove any loose debris or paint flakes.
- Apply spackling compound with a putty knife, pressing it into the hole.
- Smooth the surface so it’s flush with the surrounding wall.
- Let the compound dry completely. Drying time may vary depending on the product.
- Lightly sand the area until smooth.
- Apply primer and paint to match the wall.
Tips for Success:
- For tiny nail holes, you can often skip primer and apply touch-up paint directly.
- Apply thin layers of spackling rather than one thick layer to prevent cracking.
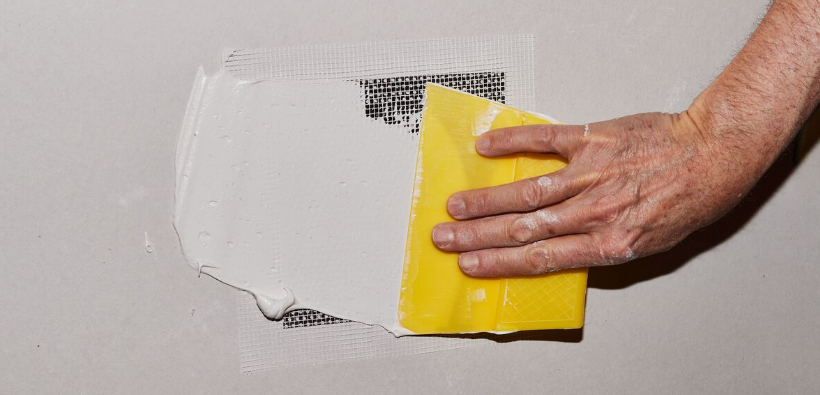
Step-by-Step Guide for Medium Holes
Medium holes require more care and stability to prevent the patch from cracking.
Steps:
- Clean and remove any loose drywall around the hole.
- Use a self-adhesive drywall patch or mesh tape to cover the opening.
- Apply a thin layer of joint compound over the patch using a putty knife.
- Let it dry completely, then sand smooth.
- Apply a second coat if necessary, feathering the edges for a seamless finish.
- Prime and paint the repaired area to match the wall.
Pro Tip: Feathering the edges of the compound ensures that the patch blends with the surrounding wall. Multiple thin coats yield the best results.
Step-by-Step Guide for Large Holes
Large holes often require cutting out the damaged section and replacing it with a new piece of drywall.
Steps:
- Use a utility knife or drywall saw to cut a clean square around the damaged area.
- Measure and cut a replacement piece of drywall to fit.
- Secure the new drywall piece with screws into the wall studs.
- Apply drywall tape over the seams.
- Cover the seams with multiple thin coats of joint compound, sanding between each coat.
- Prime and paint the area once smooth.
Pro Tip: For textured walls, match the texture before painting to maintain consistency.
Common Mistakes to Avoid
- Using too much compound at once: This can cause cracking. Apply thin layers and build up gradually.
- Skipping sanding: Sanding between coats ensures a smooth finish and seamless look.
- Ignoring moisture damage: Water-damaged drywall can lead to mold. Always check for leaks before patching.
- Mismatched paint or texture: Always match the wall texture and sheen to avoid noticeable patches.
- Rushing the drying process: Let the compound and primer dry completely to avoid uneven surfaces.
Safety Tips
- Wear a mask when sanding to avoid inhaling dust.
- Use a utility knife carefully to prevent cuts.
- Ensure the wall is structurally sound before repairing large holes.
DIY vs. Professional Repairs
While small and medium holes can often be handled by a DIYer, professional services are recommended in certain situations:
- Holes larger than 6 inches or irregular shapes.
- Water damage or mold issues.
- Textured walls or ceilings that need precise matching.
- When you want a perfect, fast, and durable finish for resale or rentals.
Professional drywall contractors, like PMPD Drywall, have the experience and tools to repair walls seamlessly, ensuring long-lasting results.
Tips for a Professional Finish
- Sand between coats: Smooth layers prevent lumps and bumps.
- Use thin coats: Multiple thin layers are stronger and more durable than one thick layer.
- Feather edges: Feathering joint compound edges blends the repair with the existing wall.
- Match paint and texture: Use the same sheen and, if applicable, the same wall texture.
- Clean tools: Avoid debris on your wall by keeping putty knives and sanding tools clean.
Maintenance Tips for Drywall
- Inspect walls regularly for small cracks or nail holes and fix them promptly.
- Avoid excessive moisture around walls to prevent water damage.
- Use wall protectors behind furniture to minimize accidental damage.
- Schedule professional inspections if you notice large cracks or sagging drywall.
Cost Considerations
- Small hole repair: $10–$30 (DIY materials)
- Medium hole repair: $30–$100 (DIY or professional patching)
- Large hole repair: $150–$500+, depending on size and complexity
- Hiring a professional ensures quality work and reduces the chance of redoing repairs.
Conclusion
Repairing drywall holes doesn’t have to be overwhelming. With the right tools, techniques, and patience, even a DIYer can achieve professional-looking results for small and medium holes. For larger repairs or textured walls, hiring a professional guarantees a seamless, long-lasting finish.